Archive for June, 2011

Password Generator and Callsign Spelling with C#

If you need help building a random password, you should check out pctools.com random password generator. It’s great, it gives you a lot of options and you can have it generate a list of 50 passwords with their callsign spellings in seconds. I’ve found the callsign spelling to be very helpful for remembering and recognizing all the characters in a new password I generate. I liked this solution so much, I decided port this concept over to C# with a set of helpers. This can be used anywhere you want to generate a password, I am currently using it in a ASP.NET LOB app to suggest and show better passwords options.

Generating Random Passwords

using System;
using System.Collections.Generic;
using System.Linq;

public static class StringHelper
{
    // Shared Static Random Generator
    private static readonly Random CommonRandom = new Random();

    public static string GenerateRandomPassword(int passwordLength, bool canRepeatCharacters = false)
    {
        char[] chars = "$%#@!*abcdefghijklmnopqrstuvwxyz1234567890?;:ABCDEFGHIJKLMNOPQRSTUVWXYZ^&".ToCharArray();

        string randomPassword = string.Empty;

        for (int l = 0; l < passwordLength; l++)
        {
            int x = CommonRandom.Next(1, chars.Length);

            if (canRepeatCharacters || !randomPassword.ToCharArray().Any(ch => ch == chars[x]))
                randomPassword += chars[x].ToString();
            else
                l--;
        }

        return randomPassword;
    }

    public static List<string> GenerateRandomPasswords(int quantity, int passwordLength = 8)
    {
        List<string> passwords = new List<string>();

        for (int i = 0; i < quantity; i++)
        {
            passwords.Add(GenerateRandomPassword(passwordLength));
        }

        return passwords;
    }
}

There are a few options on the generator, like not repeating a character and configuring the password length. In addition to the main method, I also have a helper that also returns a list of multiple passwords, to return in a list to give your users options.

Important note, Random() is not very random when your making quick consecutive calls. If you want to call Random() in a loop, you should move your instance of the Random() class to the outside to prevent duplicate seeds, which will result in duplicate passwords.

public static string GetCallsignSpelling(string password)
{
	if (string.IsNullOrEmpty(password))
		return string.Empty;

	Dictionary<char, string> callsigns = new Dictionary<char, string>()
		{
			{'$',"Dollar Symbol"},
			{'%',"Percent Symbol"},
			{'#',"Number Symbol"},
			{'@',"At Symbol"},
			{'!',"Exclamation Symbol"},
			{'*',"Asterisk Symbol"},
			{'a',"alpha"},
			{'b',"bravo"},
			{'c',"charlie"},
			{'d',"delta"},
			{'e',"echo"},
			{'f',"foxtrot"},
			{'g',"golf"},
			{'h',"hotel"},
			{'i',"india"},
			{'j',"juliet"},
			{'k',"kilo"},
			{'l',"lima"},
			{'m',"mike"},
			{'n',"november"},
			{'o',"oscar"},
			{'p',"papa"},
			{'q',"quebec"},
			{'r',"romeo"},
			{'s',"sierra"},
			{'t',"tango"},
			{'u',"uniform"},
			{'v',"victor"},
			{'w',"whiskey"},
			{'x',"xray"},
			{'y',"yankee"},
			{'z',"zulu"},
			{'1',"One"},
			{'2',"Two"},
			{'3',"Three"},
			{'4',"Four"},
			{'5',"Five"},
			{'6',"Six"},
			{'7',"Seven"},
			{'8',"Eight"},
			{'9',"Nine"},
			{'0',"Zero"},
			{'?',"Question Symbol"},
			{';',"SemiColon Symbol"},
			{':',"Colon Symbol"},
			{'A',"ALPHA"},
			{'B',"BRAVO"},
			{'C',"CHARLIE"},
			{'D',"DELTA"},
			{'E',"ECHO"},
			{'F',"FOXTROT"},
			{'G',"GOLF"},
			{'H',"HOTEL"},
			{'I',"INDIA"},
			{'J',"JULIET"},
			{'K',"KILO"},
			{'L',"LIMA"},
			{'M',"MIKE"},
			{'N',"NOVEMBER"},
			{'O',"OSCAR"},
			{'P',"PAPA"},
			{'Q',"QUEBEC"},
			{'R',"ROMEO"},
			{'S',"SIERRA"},
			{'T',"TANGO"},
			{'U',"UNIFORM"},
			{'V',"VICTOR"},
			{'W',"WHISKEY"},
			{'X',"XRAY"},
			{'Y',"YANKEE"},
			{'Z',"ZULU"},
			{'^',"Caret Symbol"},
			{'&',"Ampersand Symbol"}
		};

	char[] wordCharacters = password.ToCharArray();

	string callsignSpelling =
		wordCharacters.Aggregate(string.Empty,
									 (current, passwordCharacter) =>
									 current + (callsigns[passwordCharacter] + " - ")).TrimEnd(' ', '-');

	return callsignSpelling;
}

The spelling is done using a Key/Value dictionary, and iterating over each character of the password one-by-one.

The result of using these two helpers is below.

JSON to HTML Form Using jQuery dForm Plug-in

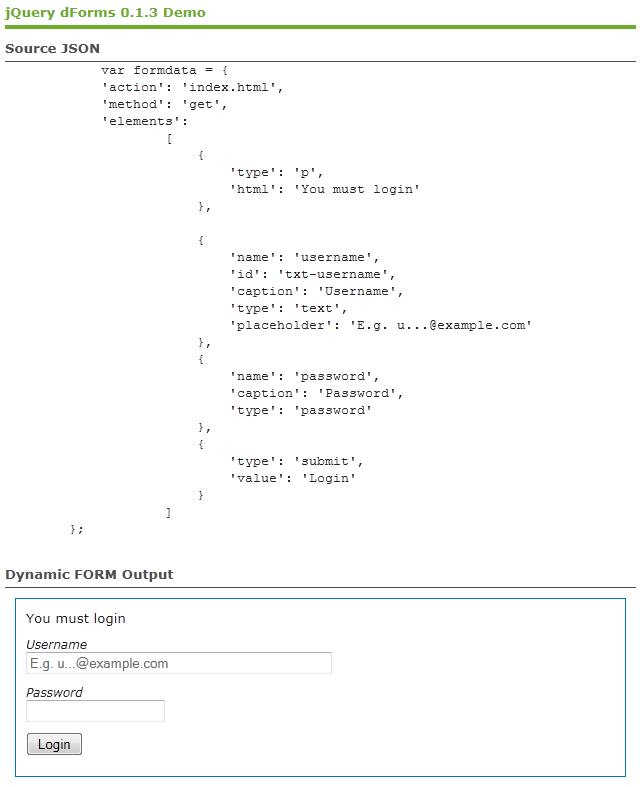
In a previous posts, I’ve showed how to go from a JSON array of objects/values, to a HTML table. This is great when you want to display a bunch of data in column and rows, but what happens if you want to interact with the data. No problem, there is the jQuery dForm plug-in for that. In order to generate the form, you’ll need to redesign your server side / inline objects to provide the required rendering data for dForms. It’s pretty straight forward and there is a ton of options with the plug-in, see here.

Demo Screenshot

In the image above, we use an inline object that will feed the dForm “buildForm()” method. I’m using a static value here, but you could have easily setup dForm to load the data remotely using ajax.

Here is the jQuery dForm 0.1.3 Plug-in Demo used in the screenshot above, which includes everything you need to get up and running fast. If you have problems making dForm work, make sure you have included “ALL” the dForm libraries. The dForm.js file has dependencies on the other libraries, if you don’t load the correct libraries, you’ll end up with a blank form.

Reusable ASP.NET MessageBox UserControl

All systems need a way to share status messages with a user, without giving them feedback they don’t what has or what will happen. There are so many different ways to send an alert (modal window, JavaScript alert, inline HTML, etc…), regardless of what you use it always help to be consistent. I built this control based on a few different ideas/examples a long time ago, and I seem to find more uses for it all the time. You can call it from the server or from the client using JavaScript, making it the perfect single solution “notification” solution.

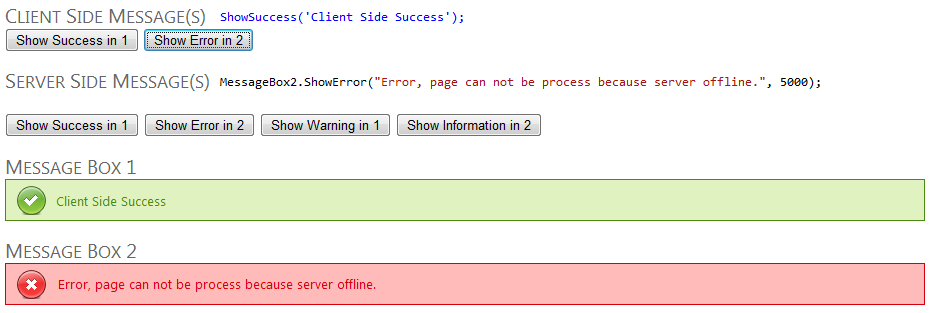
Here is an example of what it looks like.

ASP.NET MessageBox User Control Screenshot

** The text after the heading, is the code that was used to trigger the message box.

The control is pretty straight forward, on the server it works by “re-injecting” the rendered control when you call Show function. Since the control does not use viewstate, every time you post back to the server and call show again, the last message disappears and the new message is displayed. If you want the message to disappear “automatically” after a few seconds, you can can set the timeout in milliseconds. On the client (via JavaScript), you can create a simple function that will provide access to throwing alerts from the client without a postback.

Client Side Example

<script type="text/javascript">
	function ShowSuccess(message) {
		$alert = $('#MBWrapper1');

		$alert.removeClass().addClass('MessageBoxInterface');
		$alert.children('p').remove();
		$alert.append('<p>' + message + '</p>').addClass('successMsg').show().delay(8000).slideUp(300);
	}
</script>

Server Side Example

public partial class _Default : System.Web.UI.Page
{
	protected void Success_Click(object sender, EventArgs e)
	{
		MessageBox1.ShowSuccess("Success, page processed.", 5000);
	}
}

ASP.NET MessageBox User Control – Full Working Demo

Download and try the demo, if you like what you see… Here is what you need to include to make the control work in your project.

  • MessageBox User Control (ASMX & CS)
  • jQuery
  • IMessageBox.css stylesheet
  • All the graphics from the Images folder

** Note: If you move the images into a different directory, you’ll need to update the CSS to use the correct path to the images.

ASP.NET Lists Elements and Client Side Updates

A common issue I see people run into with Web Forms is the inability for client side changes to LIST elements (ListBox, DropDownList, etc…) to be passed back during POSTBACK. This is due to the how the viewstate is assigned/process, and there is no simple “hack” to bypass this. As for other non-list elements that typically implement a Text property, this isn’t an issue. Here are 3 common ways to get around the limitation in seeing changes to your LIST elements that were made on the client using jQuery/JavaScript.

1. Create a hidden field (that has a text property)

<select size="5" id="users">
    <option value="Kelly">Kelly</option>
    <option value="Kylee">Kylee</option>
    <option value="Nathan">Nathan</option>
</select>

<input type="hidden" id="userList" runat="server" value="Kelly,Kylee,Nathan"/>

Here is how you would add/parse the client side change.

var $users = $('#users');
var $usersList = $('#usersList');

$users.append($('<option></option>').val('New Entry Value').html('New Entry Text'));

var newUserList = '';
var $options = $('#users').children('option');

$.each($options, function(index, value) {
	newUserList = newUserList + $options[index].value + ',';
}); 			

$usersList.val(newUserList.substr(0, newUserList.length-1));

** In this example, you maintain a hidden input element that matches the items in the select list. When you change the select list in JavaScript, you change the value of the hidden element. During post back, you read and parse this list to make your updates.

2. Wrap your lists in an update panel

<asp:UpdatePanel ID="UpdateRoles" runat="server">
    <ContentTemplate>
        <table>
            <tr>
                <td style="height: 180px; vertical-align: top;">
                    Active Roles<br />
                    <asp:ListBox ID="lstAdd" runat="server" Width="300px" OnSelectedIndexChanged="lstAdd_SelectedIndexChanged" Rows="10"></asp:ListBox>
                </td>
                <td style="height: 180px">
                    <asp:Button ID="AddRole" runat="server" Text="->" OnClick="AddRole_Click1" />
                    <br />
                    <asp:Button ID="RemoveRole" runat="server" Text="<-" OnClick="RemoveRole_Click" />
                </td>
                <td style="height: 180px; vertical-align: top;">
                    InActive Roles<br />
                    <asp:ListBox ID="lstRemove" runat="server" Width="300px" OnSelectedIndexChanged="lstRemove_SelectedIndexChanged" Rows="10"></asp:ListBox>
                </td>
            </tr>
        </table>
    </ContentTemplate>
</asp:UpdatePanel>

Here are the events that are fired when you click the Add / Remove buttons the move items between the lists.

protected void AddRole_Click1(object sender, EventArgs e)
{
	if (lstAdd.SelectedIndex > -1)
	{
		lstRemove.Items.Add(lstAdd.SelectedItem);
		lstAdd.Items.RemoveAt(lstAdd.SelectedIndex);
	}
}

protected void RemoveRole_Click(object sender, EventArgs e)
{
	if (lstRemove.SelectedIndex > -1)
	{
		lstAdd.Items.Add(lstRemove.SelectedItem);
		lstRemove.Items.RemoveAt(lstRemove.SelectedIndex);
	}
}


** You could fire the events using any type of event, in the sample I highlighting a item in one of the two lists and click Add/Remove to switch the items between the lists.

3. Post back using Ajax

This is currently my preferred approach, since it ride on top of jQuery Ajax and follows my normal design approach to building widgets (ajax load / add / edit / delete). Using this approach you can do real-time updates as they edit the list, or you can post back your entire form including all your list changes without a post back. There are so many options when you start using ajax calls to pass data back and forth between the client and server.

My example below is using a WCF service, you can also use ASMX to do this in earlier versions of .NET. This solution has a lot more steps, but it really encompasses a whole “form submit” vs. propagating your LIST changes to the server.

To start, I also build some simple objects to pass between the client & server. The objects go both ways and are defined as a DataContract in C#.

[DataContract]
public class Member
{
	[DataMember]
	public int MemberId;

	[DataMember]
	public string CustomerCode;

	[DataMember]
	public string DelToCode;
}

[DataContract]
public class Rule
{
	[DataMember]
	public int RuleId;

	[DataMember]
	public string Name;

	[DataMember]
	public bool Enabled;

	[DataMember]
	public List&lt;Member&gt; Members;
}

One we have an opject to pass, we define a method that will use this object.

[OperationContract]
[WebInvoke(
	RequestFormat = WebMessageFormat.Json,
	ResponseFormat = WebMessageFormat.Json,
	BodyStyle = WebMessageBodyStyle.WrappedRequest)
]
bool UpdateRule(Rule rule);

public bool UpdateRule(Rule rule)
{
	// Do Update Using Object
}

Next we build a form that will be used with our server, everything on the form can be build during page load or it can be populate via Ajax.

<fieldset class="withborder" id="manageRule">
<legend>Rule Update</legend>
<ol>
	<li>
		<label class="left">
			Rule ID<em>*</em></label>
		<input type="text" class="medium disabled" id="ruleId">
	</li>
	<li>
		<label class="left">
			Name<em>*</em></label>
		<input type="text" class="medium" maxlength="5" id="ruleName">
	</li>
	<li>
		<label class="left">
			Enabled<em>*</em></label>
		<input type="checkbox" class="checkBox" id="ruleEnabled" checked="checked">
	</li>
	<li>
		<label class="left">
			Assigned<em>*</em></label>
		<div>
			<div class="dropZone available">
				<ul class="connectedSortable ui-sortable" id="available" style="">
					<li id="MemberId_1" class="ui-state-highlight">Red</li>
					<li id="MemberId_2" class="ui-state-highlight">Green</li>
				</ul>
			</div>
			<div class="dropZone included">
				<ul class="connectedSortable ui-sortable" id="included" style="">
					<li id="MemberId_3" class="ui-state-highlight">Blue</li>
					<li id="MemberId_4" class="ui-state-highlight">Yellow</li>
					<li id="MemberId_5" class="ui-state-highlight">Orange</li>
				</ul>
			</div>
		</div>
	</li>
	<li style="text-align: right;">
		<input type="button" value="Update Rule" text="Add" id="updateRule">
	</li>
</ol>
</fieldset>

Finally, we put it all together with JavaScript function that uses jQuery and JSON.org’s libraries to build and transfer data between the client and sever.

function UpdateRule() {
	var rule;

	rule.RuleId = parseInt($('#ruleId').val());
	rule.Name = $('#ruleName').val();
	rule.Enabled = $('#ruleEnabled').is(':checked');

	var $includedMembers = $('#included > li');

	rule.Members = [];

	// This is where you parse / add the values of your list (listbox, li, etc...)
	if ($includedMembers.length > 0) {
		$.each($includedMembers, function (index, value) {
			var id = $includedMembers[index].id.replace('MemberId_', '');
			var name = $includedMembers[index].firstChild.data.split(' - ');
			var member = { 'CustomerCode': name[0], 'DelToCode': name[1], 'MemberId': id };
			rule.Members.push(member);
		});
	}

	$.ajax({
		url: '/Service/ExampleWCFService.svc/UpdateRule',
		contentType: 'application/json; charset=utf-8',
		dataType: 'json',
		type: 'POST',
		data: JSON.stringify({ 'rule': rule }),
		success: function (rule) {
			// Do Something On Success
		}
	});
}

** Don’t forget, you could have your service store this data in the cache/session/etc… if you don’t want to store it real-time. In my sample, I send the whole form to be process and not just the list. This gets rid of the entire post back process.

Each has it’s own unique requirements, the only one I tend not to use anymore is #2 since it requires the addition of the ASP.NET Ajax Library. Having an additional library and added content in a project for this one feature isn’t worth it to me. I know the library has got more compact, but in general it’s quite heavy (size wise), and since I already “always” include jQuery there really isn’t a need for this baggage.

JSON to CSV

I created a helper a few months back that used DATA URIs to download JSON to CSV, but due to IE’s implementation of DATA URIs (or lack of), it does not work for IE (all versions). Here is the same helper that will just convert the data, which you can use anyway you want (example: in a popup, to display in a modal window, etc…).

<html>
<head>
    <title>Demo - Covnert JSON to CSV</title>
    <script type="text/javascript" src="http://code.jquery.com/jquery-latest.js"></script>
    <script type="text/javascript" src="https://github.com/douglascrockford/JSON-js/raw/master/json2.js"></script>

    <script type="text/javascript">
		// JSON to CSV Converter
        function ConvertToCSV(objArray) {
            var array = typeof objArray != 'object' ? JSON.parse(objArray) : objArray;
            var str = '';

            for (var i = 0; i < array.length; i++) {
                var line = '';
                for (var index in array[i]) {
                    if (line != '') line += ','

                    line += array[i][index];
                }

                str += line + '\r\n';
            }

            return str;
        }

		// Example
        $(document).ready(function () {

			// Create Object
            var items = [
				  { name: "Item 1", color: "Green", size: "X-Large" },
				  { name: "Item 2", color: "Green", size: "X-Large" },
				  { name: "Item 3", color: "Green", size: "X-Large" }];

			// Convert Object to JSON
			var jsonObject = JSON.stringify(items);

			// Display JSON
            $('#json').text(jsonObject);

			// Convert JSON to CSV & Display CSV
            $('#csv').text(ConvertToCSV(jsonObject));
        });
    </script>
</head>
<body>
    <h1>
        JSON</h1>
    <pre id="json"></pre>
    <h1>
        CSV</h1>
    <pre id="csv"></pre>
</body>
</html>

Here is the output using the script and above.

JSON

Created with “JSON.stringify()” function from json.org.

[{"name":"Item 1","color":"Green","size":"X-Large"},{"name":"Item 2","color":"Green","size":"X-Large"},{"name":"Item 3","color":"Green","size":"X-Large"}]

CSV

Created with “ConvertToCSV()” function I created above.

Item 1,Green,X-Large
Item 2,Green,X-Large
Item 3,Green,X-Large