Posting JSON from NodeMCU using ESP8266 WIFI to a HTTPS REST API and stored in MariaDB (example API written as WordPress Plugin).
Hardware
ESP8266 NodeMCU Mini Development Board (Amazon @ 5 for $14.99)
ESP8266 NodeMCU Development Board (Amazon @ 3 for $16.39)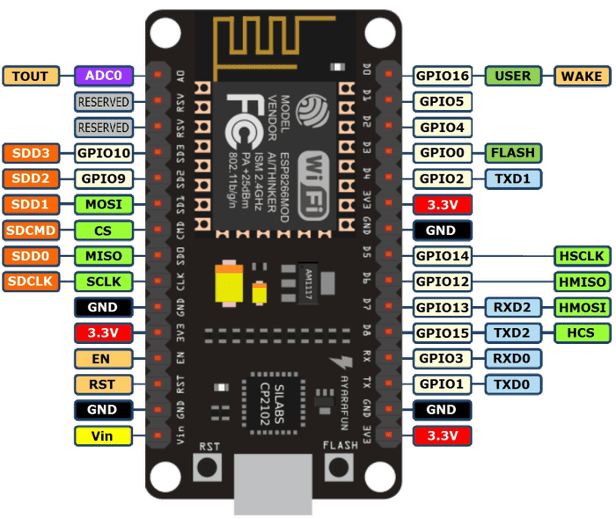
DHT 3-PIN Sensor
Wiring
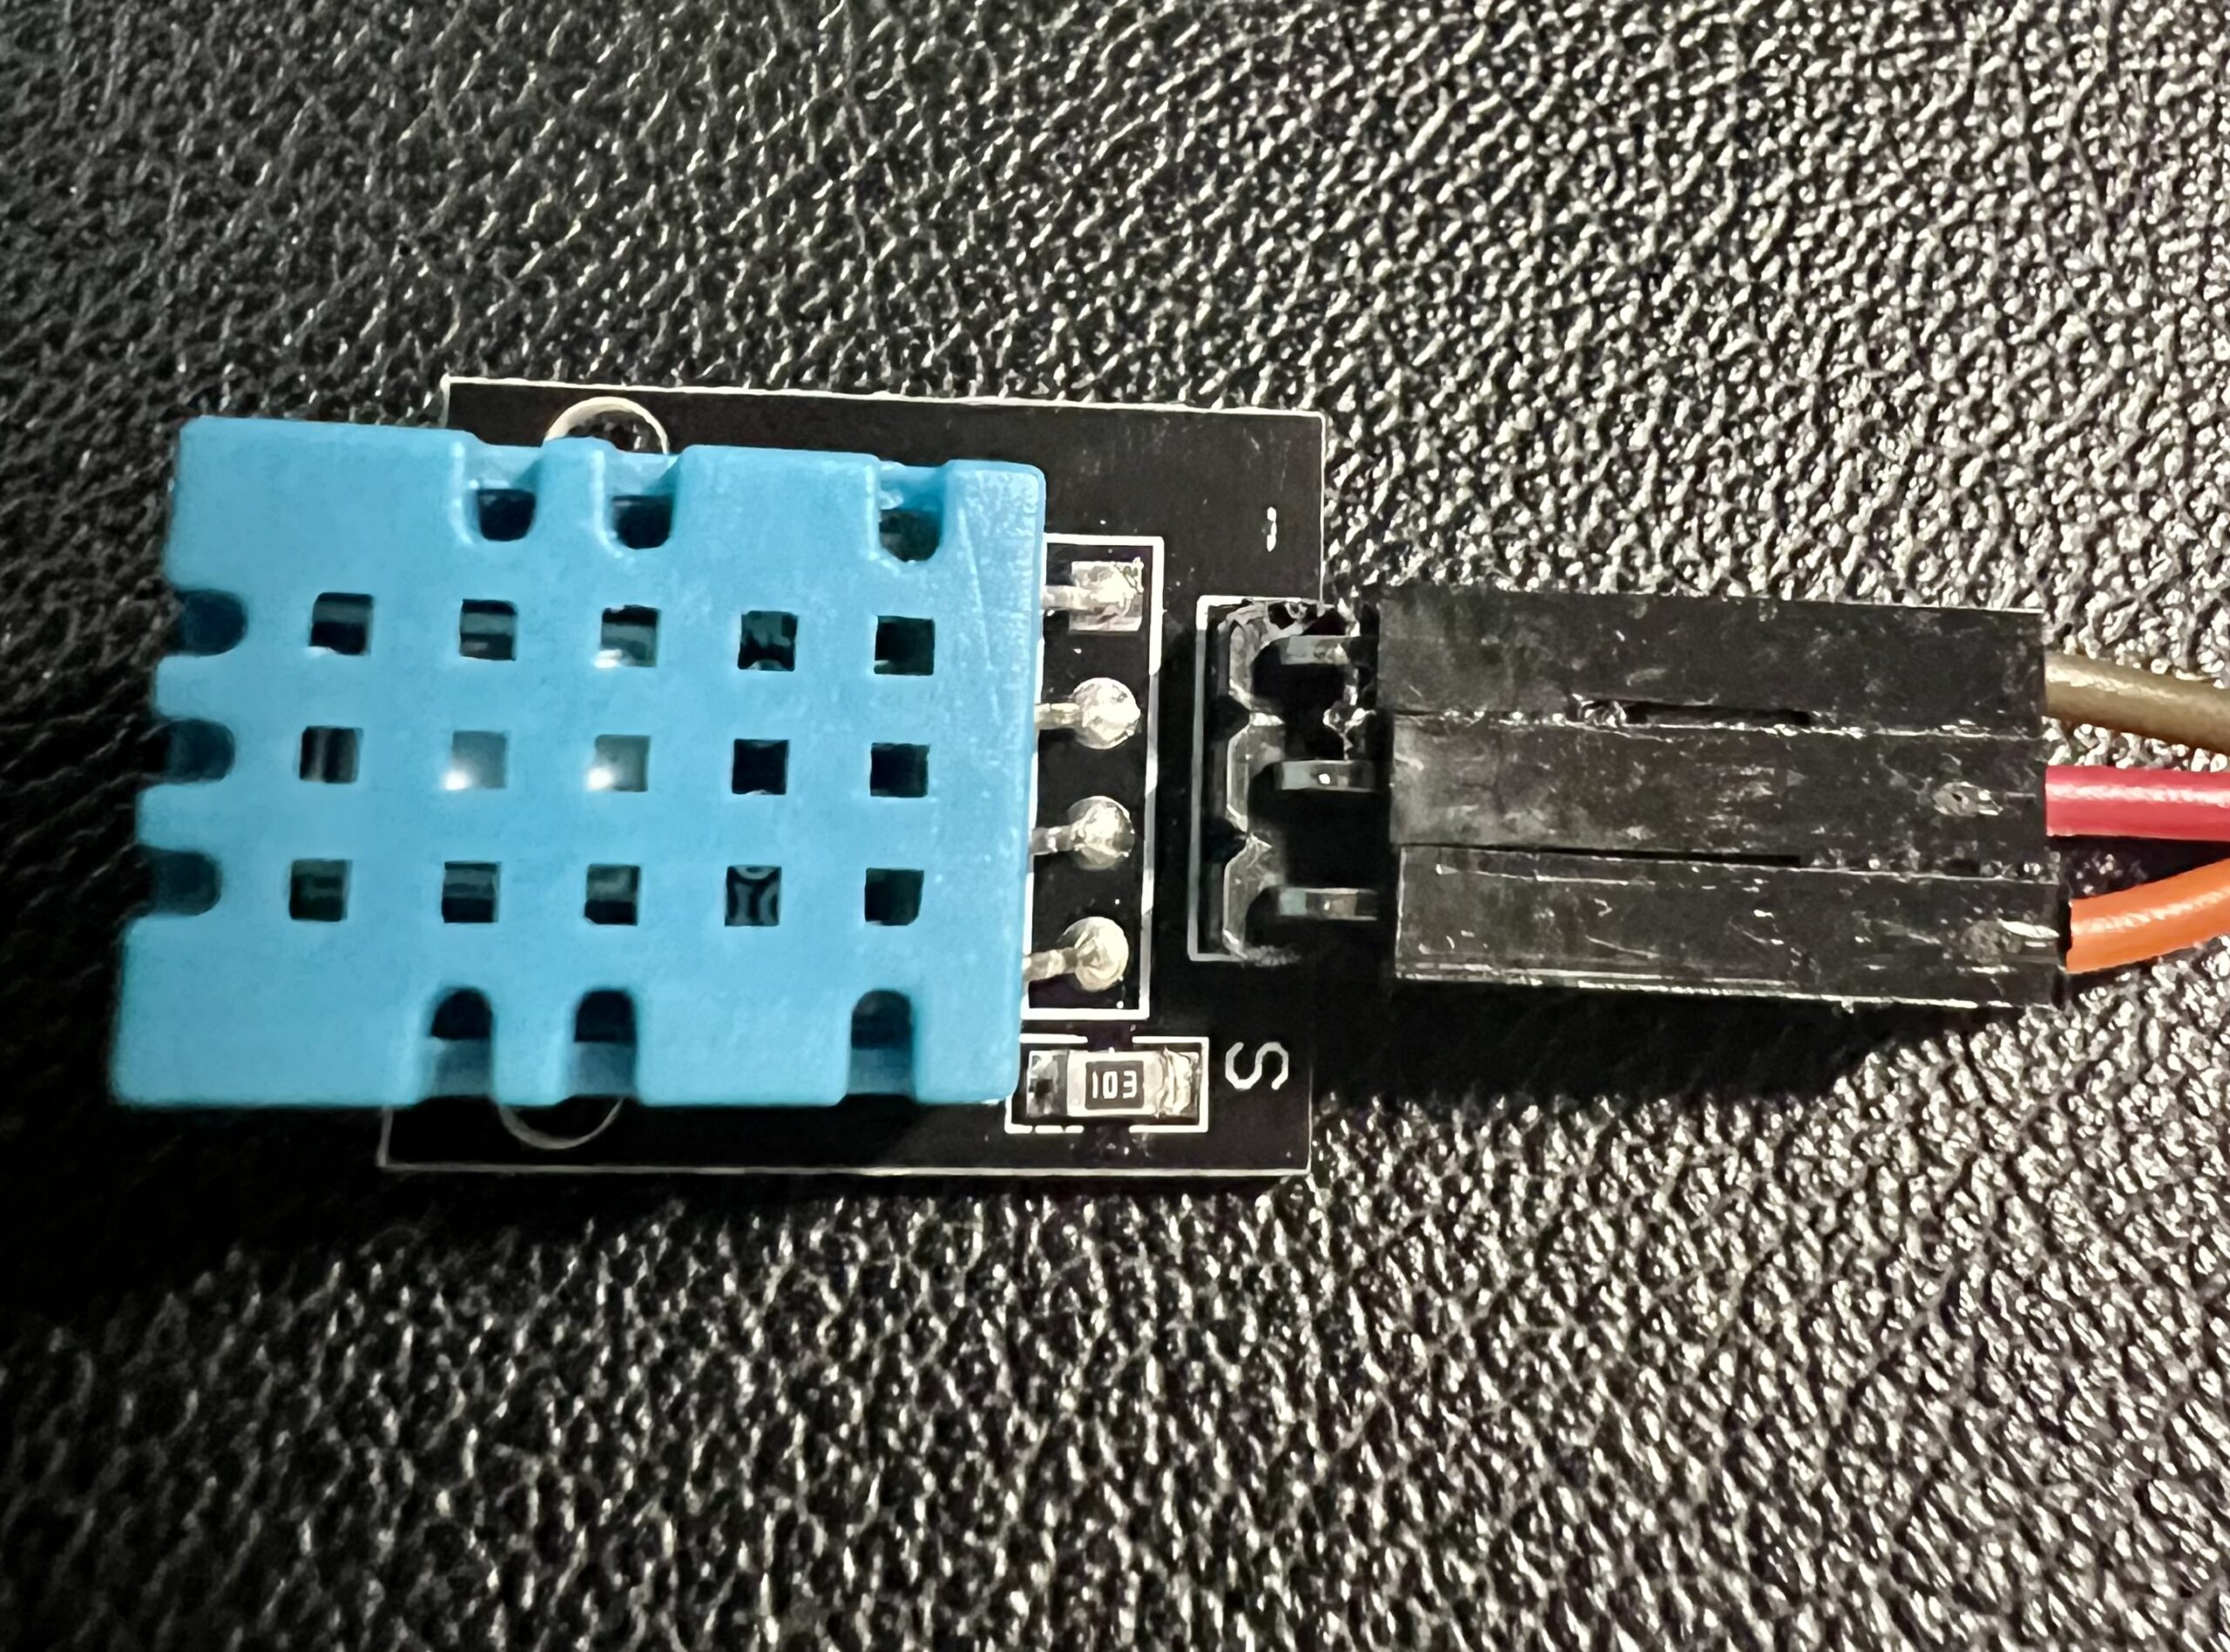
Sensor Wiring: Using 3 wires, I used Red = 3.3V, Brown = Ground, Orange = D4 (GPIO2).
In the image above, you can see the connector closest to the “S” is Orange for Data, Middle is Red for Power, and last wire next to “–” is Brown for Ground.
Development Environment
Arduino IDE v2.3.2
Preferences => Additional boards manager URLs => Enter URL: https://arduino.esp8266.com/stable/package_esp8266com_index.json
Tools => Board => Boards Manager => Search “esp8266” and install esp8266 by ESP8266 Community v3.1.2
Tools => Board => esp8266 => NodeMCU 1.0 (ESP-12E Module)
Add Library: Arduino_JSON v0.2.0
Add Library: DHT sensor library v1.4.6
ESP8266 NodeMCU requires the Silicon Labs CP210x Windows Drivers, that can be found here.
Once everything is setup, make sure your MCU shows up in the Arduino IDE by going to Tools => Port and choosing the COM port associated with your device (will be different for everybody). I didn’t need to change any other settings to communicate with the MCU via the Arduino IDE.
Arduino Program
/*
    HTTP REST API POST/GET over TLS (HTTPS)
*/

#include <ESP8266WiFi.h>
#include <ESP8266HTTPClient.h>
#include <WiFiClientSecure.h>
#include <Arduino_JSON.h>
#include "certs.h"
#include "DHT.h"

// DHT-11's Setup
#define DHTPIN 2
#define DHTTYPE DHT11
DHT dht(DHTPIN, DHTTYPE);

// ESP8266 WIFI Setup
const char* ssid = "WIFI-SSID";
const char* password = "WIFI-Password";
const char* serverName = "https://www.ENTER-RESTAPI.com/";

unsigned long lastTime = millis() - 60000;
// Timer set to 1 seconds (1000)
unsigned long timerDelay = (1000 * 60 * 5);

X509List cert(cert_ISRG_Root_X1);

void setup() {
  dht.begin();

  Serial.begin(115200);

  WiFi.begin(ssid, password);
  Serial.println("Connecting");
  while (WiFi.status() != WL_CONNECTED) {
    delay(500);
    Serial.print(".");
  }
  Serial.println("");
  Serial.print("Connected to WiFi network with IP Address: ");
  Serial.println(WiFi.localIP());

  // Set time via NTP, as required for x.509 validation
  configTime(3 * 3600, 0, "pool.ntp.org", "time.nist.gov");

  Serial.print("Waiting for NTP time sync: ");
  time_t now = time(nullptr);
  while (now < 8 * 3600 * 2) {
    delay(500);
    Serial.print(".");
    now = time(nullptr);
  }
  Serial.println("");
  struct tm timeinfo;
  gmtime_r(&now, &timeinfo);
  Serial.print("Current time: ");
  Serial.print(asctime(&timeinfo));

  Serial.print("Program posts to REST API Every ");
  Serial.print(timerDelay/1000);
  Serial.println(" seconds.");
}

void loop() {
  // Send an HTTP POST request depending on timerDelay
  if ((millis() - lastTime) > timerDelay) {

    // ========================================================
    // READ DHT Sensor Values Humidity & Temp in C
    // ========================================================

    // Read humidity.
    float h = dht.readHumidity();
    float humidNow = truncf(h * 10) / 10;

    // Read temperature as Celsisu (the default)
    float t = dht.readTemperature();
    // Convert temperature to Fahrenheit
    float tempNow = (t * 1.8) + 32;

    // Print Humidity & Temperature in Fahrenheit to Serial Monitor
    Serial.print("Humidity: ");
    Serial.print(humidNow);
    Serial.print("% Temperature: ");
    Serial.print(tempNow);
    Serial.println("°F");

    //Check WiFi connection status
    if (WiFi.status() == WL_CONNECTED) {

      // ========================================================
      // GET Request for DB Values
      // ========================================================
      // String sensorReadings = httpGETRequest(serverName);
      // JSONVar myArray = JSON.parse(sensorReadings);

      // if (JSON.typeof(myArray) == "undefined") {
      //   Serial.println("Parsing input failed!");
      //   return;
      // }

      // Serial.print("JSON object = ");
      // Serial.println(sensorReadings);

      // for (int i = 0; i < myArray.length(); i++) {
      //   JSONVar value = myArray[i];
      //   Serial.print(i);
      //   Serial.print(" = ");
      //   Serial.println(value["sensorValue"]);
      // }

      // ========================================================
      // POST Sensor Value to the DB via REST API
      // ========================================================
      JSONVar myObject;
      myObject["sendorValue"] = WiFi.localIP().toString();
      myObject["sensorType"] = "DHT";
      myObject["sensorValue"] = std::round(tempNow * 100.0) / 100.0;

      String jsonString = JSON.stringify(myObject);
      String sensorWriting = httpPOSTRequest(serverName, jsonString);
      Serial.println("==============================================================================");

    } else {
      Serial.println("WiFi Disconnected");
    }
    lastTime = millis();
  }
}

// POST JSON Data to REST API
String httpPOSTRequest(const char* serverName, String httpRequestData) {
  WiFiClientSecure client;
  HTTPClient http;

  client.setTrustAnchors(&cert);

  // Enable if your having certificate issues
  //client.setInsecure();

  Serial.println("Secure POST Request to: " + String(serverName));
  Serial.println("Payload: " + httpRequestData);

  http.begin(client, serverName);
  http.addHeader("Authorization", "KEY-TO-ACCESS");
  http.addHeader("Content-Type", "application/json");

  int httpResponseCode = http.POST(httpRequestData);

  String payload = "{}";

  if (httpResponseCode > 0) {
    Serial.print("HTTP Response code: ");
    Serial.println(httpResponseCode);
    payload = http.getString();
  } else {
    Serial.print("Error code: ");
    Serial.println(httpResponseCode);
  }

  Serial.println();

  http.end();

  return payload;
}

// GET Request to REST API
String httpGETRequest(const char* serverName) {
  WiFiClientSecure client;
  HTTPClient http;

  client.setTrustAnchors(&cert);

  // Enable if your having certificate issues
  //client.setInsecure();

  Serial.println("Secure GET Request to: " + String(serverName));

  http.begin(client, serverName);
  http.addHeader("Authorization", "KEY-TO-ACCESS");

  int httpResponseCode = http.GET();

  String payload = "{}";

  if (httpResponseCode > 0) {
    Serial.print("HTTP Response code: ");
    Serial.println(httpResponseCode);
    payload = http.getString();
  } else {
    Serial.print("Error code: ");
    Serial.println(httpResponseCode);
  }

  Serial.println();

  http.end();

  return payload;
}
REST Endpoint (Custom WordPress Plugin)
<?php
/**
 * Plugin Name: WP Arduino API Gateway
 * Version: 0.0.2
 * File Name: \wp-content\plugins\wp-arduino\wp-arduino.php
 * Description: REST Plugin to listen for NodeMCU GET/POST Requests
 * Text Domain: wp-arduino
 */

// Exit if accessed directly.
if (!defined('ABSPATH'))
    exit;

register_activation_hook(__FILE__, 'wp_arduino_setup_table');
function wp_arduino_setup_table()
{
    global $wpdb;
    $table_name = $wpdb->prefix . 'arduino';

    $sql = "CREATE TABLE $table_name (
        id mediumint(9) NOT NULL AUTO_INCREMENT,
        sensorType varchar (100) NOT NULL,
        sendorValue varchar (100) NOT NULL,
        createdOn datetime NOT NULL DEFAULT CURRENT_TIMESTAMP,
        PRIMARY KEY (id)
    )";

    require_once ABSPATH . 'wp-admin/includes/upgrade.php';
    dbDelta($sql);

}

add_action('rest_api_init', 'wp_adruino_register_routes');
function wp_adruino_register_routes()
{
    /* GET */
    register_rest_route(
        'wp-arduino-api/v1',
        '/arduino/',
        array(
            'methods' => 'GET',
            'callback' => 'wp_arduino_get',
            'permission_callback' => 'application_password_auth_validation'
        )
    );
    /* POST */
    register_rest_route(
        'wp-arduino-api/v1',
        '/arduino/',
        array(
            'methods' => 'POST',
            'callback' => 'wp_arduino_post',
            'permission_callback' => 'application_password_auth_validation'
        )
    );
}

/* Security Auth Check */
function application_password_auth_validation()
{
    //return current_user_can( 'contributor' );
    return true;
}

/* GET */
function wp_arduino_get()
{
    //Get HTTP request headers
    $auth = apache_request_headers();

    //Get only Authorization header
    $valid = $auth['Authorization'];

    // Validate
    if ($valid == 'KEY-TO-ACCESS') {
        global $wpdb;
        $table_name = $wpdb->prefix . 'arduino';

        $response = $wpdb->get_results("SELECT * FROM $table_name ORDER BY id DESC LIMIT 20;");
    } else {
        $response = 'Please use a valid authentication';
    }

    return $response;
}

/* POST */
function wp_arduino_post($request)
{
    //Get HTTP request headers
    $auth = apache_request_headers();

    //Get only Authorization header
    $valid = $auth['Authorization'];

    // Validate
    if ($valid == 'KEY-TO-ACCESS') {
        global $wpdb;
        $table_name = $wpdb->prefix . 'arduino';

        $rows = $wpdb->insert(
            $table_name,
            array(
                'sendorValue' => $request['sendorValue'],
                'sensorType' => $request['sensorType'],
                'sensorValue' => $request['sensorValue']
            )
        );

        $response = $rows;
    } else {
        $response = 'Please use a valid authentication';
    }

    return $response;
}
Once you save the file to the location in the file header on your WordPress instance (you can copy via FTP, or upload via WordPress Plugin screen), you’ll be ready to “Activate” your plugin. This will create a table in your WordPress site called wp_arduino and start listening for requests to save data from your NodeMCU. You will need to generate a certificate chain for your website, I used the python script below to do it.
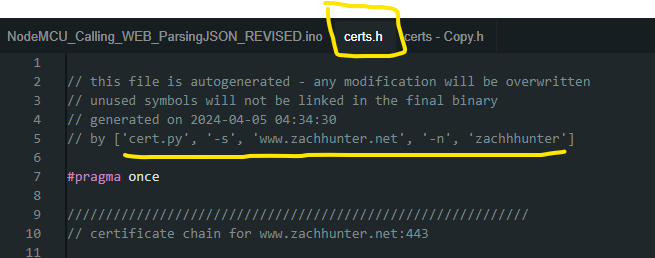
The code below is for a modified version of cert.py, as the version that comes with the esp8266 doesn’t use UTC time and it throws errors when you try to generate your certificate file. You should save the code below into a file named “certs.py” into your Arduino project folder and run it with the syntax in the image to generate your “certs.h” file needed for HTTP over TLS (HTTPS).
#!/usr/bin/env python3

# Script to download/update certificates and public keys
# and generate compilable source files for c++/Arduino.
# released to public domain

import urllib.request
import re
import ssl
import sys
import socket
import argparse
import datetime

from datetime import datetime, timezone
from cryptography import x509
from cryptography.hazmat.primitives import hashes
from cryptography.hazmat.primitives.serialization import pkcs7
from cryptography.hazmat.primitives.serialization import Encoding
from cryptography.hazmat.primitives.serialization import PublicFormat

def printData(data, showPub = True):
    try:
        xcert = x509.load_der_x509_certificate(data)
    except:
        try:
            xcert = x509.load_pem_x509_certificate(data)
        except:
            try:
                xcert = pkcs7.load_der_pkcs7_certificates(data)
            except:
                xcert = pkcs7.load_pem_pkcs7_certificates(data)
            if len(xcert) > 1:
                print('// Warning: TODO: pkcs7 has {} entries'.format(len(xcert)))
            xcert = xcert[0]

    cn = ''
    for dn in xcert.subject.rfc4514_string().split(','):
        keyval = dn.split('=')
        if keyval[0] == 'CN':
            cn += keyval[1]
    name = re.sub('[^a-zA-Z0-9_]', '_', cn)
    print('// CN: {} => name: {}'.format(cn, name))

    print('// not valid before:', xcert.not_valid_before_utc)
    print('// not valid after: ', xcert.not_valid_after_utc)

    if showPub:

        fingerprint = xcert.fingerprint(hashes.SHA1()).hex(':')
        print('const char fingerprint_{} [] PROGMEM = "{}";'.format(name, fingerprint))

        pem = xcert.public_key().public_bytes(Encoding.PEM, PublicFormat.SubjectPublicKeyInfo).decode('utf-8')
        print('const char pubkey_{} [] PROGMEM = R"PUBKEY('.format(name))
        print(pem + ')PUBKEY";')

    else:

        cert = xcert.public_bytes(Encoding.PEM).decode('utf-8')
        print('const char cert_{} [] PROGMEM = R"CERT('.format(name))
        print(cert + ')CERT";')

    cas = []
    for ext in xcert.extensions:
        if ext.oid == x509.ObjectIdentifier("1.3.6.1.5.5.7.1.1"):
            for desc in ext.value:
                if desc.access_method == x509.oid.AuthorityInformationAccessOID.CA_ISSUERS:
                    cas.append(desc.access_location.value)
    for ca in cas:
        with urllib.request.urlopen(ca) as crt:
            print()
            print('// ' + ca)
            printData(crt.read(), False)
        print()

def get_certificate(hostname, port, name):
    context = ssl.create_default_context()
    context.check_hostname = False
    context.verify_mode = ssl.CERT_NONE
    with socket.create_connection((hostname, port)) as sock:
        with context.wrap_socket(sock, server_hostname=hostname) as ssock:
            print('////////////////////////////////////////////////////////////')
            print('// certificate chain for {}:{}'.format(hostname, port))
            print()
            if name:
                print('const char* {}_host = "{}";'.format(name, hostname));
                print('const uint16_t {}_port = {};'.format(name, port));
                print()
            printData(ssock.getpeercert(binary_form=True))
            print('// end of certificate chain for {}:{}'.format(hostname, port))
            print('////////////////////////////////////////////////////////////')
            print()
            return 0

def main():
    parser = argparse.ArgumentParser(description='download certificate chain and public keys under a C++/Arduino compilable form')
    parser.add_argument('-s', '--server', action='store', required=True, help='TLS server dns name')
    parser.add_argument('-p', '--port', action='store', required=False, help='TLS server port')
    parser.add_argument('-n', '--name', action='store', required=False, help='variable name')
    port = 443
    args = parser.parse_args()
    server = args.server
    port = 443
    try:
        split = server.split(':')
        server = split[0]
        port = int(split[1])
    except:
        pass
    try:
        port = int(args.port)
    except:
        pass

    print()
    print('// this file is autogenerated - any modification will be overwritten')
    print('// unused symbols will not be linked in the final binary')
    print('// generated on {}'.format(datetime.now(timezone.utc).strftime("%Y-%m-%d %H:%M:%S")))
    print('// by {}'.format(sys.argv))
    print()
    print('#pragma once')
    print()
    return get_certificate(server, port, args.name)

if __name__ == '__main__':
    sys.exit(main())
The final results should be shown as below, via the serial monitor in the Arduino IDE when uploaded/running.

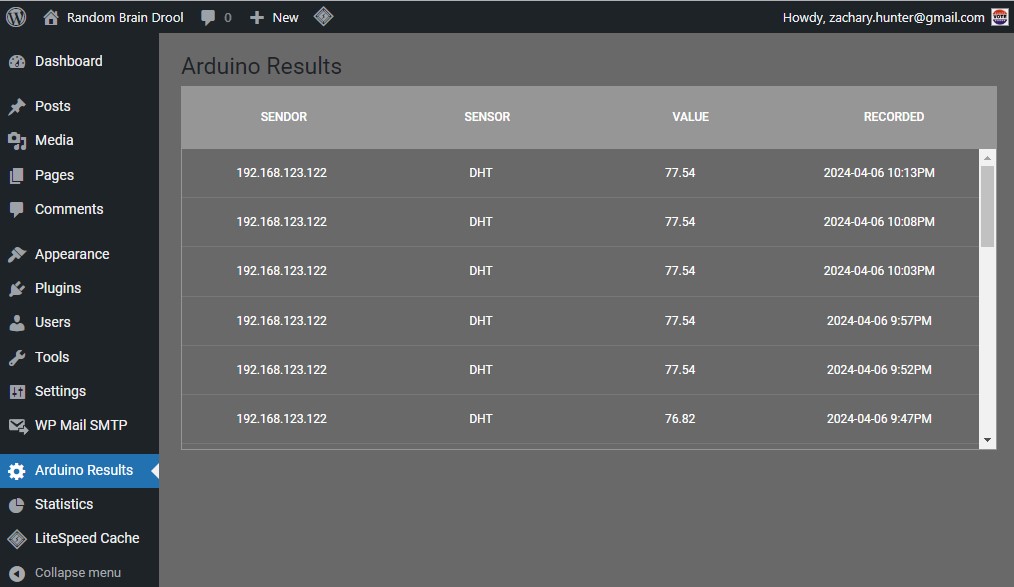
I created a simple Admin Menu Item (Arduino Results) and have it display the last 20 entries that were uploaded into the DB, since dates were loaded as UTC you need to convert to your local timezone.
<?php
// /wp-content/plugins/ct-wp-admin-form/ct-wp-admin-form.php
/**
 * Plugin Name:     WP Arduino API Gateway Admin
 * Version:         1.0.0
 * Text Domain:     wp-arduino
 */

function wp_admin()
{
  wp_register_style('wp_admin', plugins_url('wp-arduino.css', __FILE__));
  wp_enqueue_style('wp_admin');
  wp_register_script('wp_admin', plugins_url('wp-arduino.js', __FILE__));
  wp_enqueue_script('wp_admin');
}

add_action('admin_init', 'wp_admin');

// this function generates the results table
function wp_arduino_table()
{

  global $wpdb;
  $table_name = $wpdb->prefix . 'arduino';
  $results = $wpdb->get_results("SELECT sendorValue, sensorType, sensorValue, DATE_FORMAT(CONVERT_TZ(createdOn,'+00:00','-07:00'),'%Y-%m-%d %l:%i%p') as createdOn FROM $table_name ORDER BY id DESC LIMIT 20;");

  $content = '<div class="tbl-header">';
  $content .= '  <table cellpadding="0">';
  $content .= '    <thead></tr><th>Sendor</th><th>Sensor</th><th>Value</th><th>Recorded</th></tr></thead>';
  $content .= '  </table>';
  $content .= '</div>';
  $content .= '<div class="tbl-content">';
  $content .= '  <table cellpadding="0" cellspacing="0" border="0">';
  $content .= '    <tbody>';
  foreach ($results as $row)
  {
    $content .= '      <tr>';
    $content .= '        <td>' . $row->sendorValue . '</td>';
    $content .= '        <td>' . $row->sensorType . '</td>';
    $content .= '        <td>' . $row->sensorValue . '</td>';
    $content .= '        <td>' . $row->createdOn . '</td>';
    $content .= '      </tr>';
  }
  $content .= '    </tbody>';
  $content .= '  </table>';
  $content .= '</div>';

  // return the table
  return $content;
}

//Add admin page to the menu
add_action('admin_menu', 'add_admin_page');
function add_admin_page()
{
  // add top level menu page
  add_menu_page(
    'Arduino Results', //Page Title
    'Arduino Results', //Menu Title
    'manage_options', //Capability
    'wp-arduino', //Page slug
    'admin_page_html' //Callback to print html
  );
}

//Admin page html callback
//Print out html for admin page
function admin_page_html()
{
  // check user capabilities
  if (!current_user_can('manage_options')) {
    return;
  }
  ?>

  <!-- Our admin page content should all be inside .wrap -->
  <div class="wrap">
    <!-- Print the page title -->
    <h1>
      <?php echo esc_html(get_admin_page_title()); ?>
    </h1>
    <?php echo wp_arduino_table(); ?>
  </div>

  <?php
}