Details, details, details… I just spend a few days moving over to svc-less WCF services with a ASP.NET 4.0 web application, and boy was it fun… The overall setup is pretty easy, once you’ve painfully gone through the process “a few” times. Since this is something I’ll no be doing by default on all new projects, I thought this would make a great write-up tutorial. During my discovery and learning phase, I found a bunch of helpful blog posts but nothing was 100% and there was lots of those “important” bits missing. Since most of my projects consume JSON, I plan to do a 4 part series on setting up a Web Application to support WCF services that will be called via jQuery.
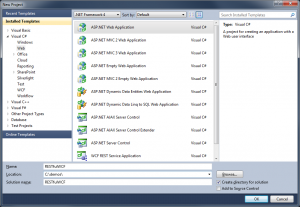
Enough with the background, let’s start by creating a new “ASP.NET Web Application”.
- Remove everything inside the Scripts folder.
- Right Click on Project, and choose “Manage NuGet Packages…”
Hopefully your familiar with NuGet, it’s a package manager for Visual Studio and you can install it by going to Tools -> Extension Manager… -> Online Gallery -> Download “NuGet Package Manager”. This is the most popular extension and it allows you to quickly add bits to your projects (e.g. Install jQuery, and be notified when a new version is available.).
- Use search to install the following NuGet Packages.
- jQuery
- JSON-js json2
- Edit your “site.master” to and include your new scripts:
	   <script src="Scripts/jquery-1.7.2.js" type="text/javascript"></script>
	   <script src="Scripts/jquery-ui-1.8.19.js" type="text/javascript"></script>
	   <script src="Scripts/jquery.validate.js" type="text/javascript"></script>
- Also in the “site.master”, edit your asp:Menu to include 4 pages called Part1 – Part4:
                <asp:Menu ID="NavigationMenu" runat="server" CssClass="menu" EnableViewState="false" IncludeStyleBlock="false" Orientation="Horizontal">
                    <Items>
                        <asp:MenuItem NavigateUrl="~/Default.aspx" Text="Home"/>
                        <asp:MenuItem NavigateUrl="~/Part1.aspx" Text="Part 1"/>
                        <asp:MenuItem NavigateUrl="~/Part2.aspx" Text="Part 2" />
                        <asp:MenuItem NavigateUrl="~/Part3.aspx" Text="Part 3" />
                        <asp:MenuItem NavigateUrl="~/Part3.aspx" Text="Part 4" />
                        <asp:MenuItem NavigateUrl="~/About.aspx" Text="About" />
                    </Items>
                </asp:Menu>
** We are only going to use Part1.aspx right now, but I plan on 4 posts on this topic.
- Add 4 new “Web Form using Master Page” to the project called Page1.aspx, Page2.aspx, Page3.aspx, Page4.aspx.
** These will match the named used in the navigation menu in the site.master. - Add a new folder to the root of the project called Service.
- Add a new “AJAX-enabled WCF Service” to the Service folder called “InventoryService.svc”.
- Note, this will add the following references to your project.
	     System.Runtime.Serialization
	     System.ServiceModel
	     System.ServiceModel.Web
- It will also add the following lines to your Web.config
	  <system.webServer>
		 <modules runAllManagedModulesForAllRequests="true"/>
	  </system.webServer>

	  <system.serviceModel>
		<behaviors>
		  <endpointBehaviors>
			<behavior name="RESTfulWCF.Service.Service1AspNetAjaxBehavior">
			  <enableWebScript />
			</behavior>
		  </endpointBehaviors>
		</behaviors>
		<serviceHostingEnvironment aspNetCompatibilityEnabled="true"
		  multipleSiteBindingsEnabled="true" />
		<services>
		  <service name="RESTfulWCF.Service.Service1">
			<endpoint address="" behaviorConfiguration="RESTfulWCF.Service.Service1AspNetAjaxBehavior"
			  binding="webHttpBinding" contract="RESTfulWCF.Service.Service1" />
		  </service>
		</services>
	  </system.serviceModel>
- Change the “system.serviceModel” section of your web.config to the following.
	    <system.serviceModel>
	        <serviceHostingEnvironment aspNetCompatibilityEnabled="true"/>
	        <standardEndpoints>
	            <webHttpEndpoint>
	                <standardEndpoint name="" helpEnabled="true" automaticFormatSelectionEnabled="true"/>
	            </webHttpEndpoint>
	        </standardEndpoints>
	    </system.serviceModel>
Web.Config Key Points
	// This allows your services to run under your sites app pool, giving access
	// to your HttpContext.
	aspNetCompatibilityEnabled="true"
	// See below, this allows you to type <service>/help to get information on your service
	helpEnabled="true"
	// This is AWESOME, this tag allows your service to respond in any format you
	// specify in your request (e.g. XML, JSON, etc...).
	automaticFormatSelectionEnabled="true"
** One last item to note, every time you add an additional AJAX service, it will edit your web.config and put back in the bad configuration. I strongly suggest you make a backup of your web.config, incase you run into problems in the future!!!
- Manually add a project reference to System.ServiceModel.Activation.
- Note, this will add the following references to your project.
- At this point, your project in solution explorer should look like this:
- Now, open InventoryService.svc and make the following changes:
- Erase everything and add the following C# code:
using System.ServiceModel;
using System.ServiceModel.Activation;
using System.ServiceModel.Web;

namespace RESTfulWCF.Service
{
    [ServiceContract(Namespace = "")]
    [AspNetCompatibilityRequirements(RequirementsMode = AspNetCompatibilityRequirementsMode.Allowed)]
    public class InventoryService
    {
        [WebGet(UriTemplate = "Part1")]
        [OperationContract]
        public string Part1GetRequest()
        {
            return "I did work";
        }
    }
}
In the code above, we are mapping the function “Part1GetRequest” to the name “Part1”. This will allow us to call the service with the following syntax “/InventoryService/Part1” using a GET request.
- Erase everything and add the following C# code:
- Add a route to call the service without referencing a “.svc” file.
Open Global.asax and replace your Applicaiton_Start with the following.void Application_Start(object sender, EventArgs e) { // Code that runs on application startup RouteTable.Routes.Add(new ServiceRoute("InventoryService", new WebServiceHostFactory(), typeof(Service.InventoryService))); } - Now we are ready to create a jQuery test call, open “Page1.aspx” in Source View:
Erase everything and add the following HTML code
<%@ Page Title="" Language="C#" MasterPageFile="~/Site.Master" AutoEventWireup="true" CodeBehind="Part1.aspx.cs" Inherits="RESTfulWCF.Part1" %>
<asp:Content ID="Content1" ContentPlaceHolderID="HeadContent" runat="server">
</asp:Content>
<asp:Content ID="Content2" ContentPlaceHolderID="MainContent" runat="server">
    <script type="text/javascript">
        $(document).ready(function ()
        {
            $('#doWork').click(function ()
            {
                $.getJSON('/InventoryService/Part1', '', function (result) { alert(result); });
            });
        });
    </script>
    <h2>
        ASP.NET 4.0 WCF RESTful Demo - Part 1
    </h2>
    <p>
        <input type="button" id="doWork" value="Issue GET Request" />
    </p>
</asp:Content>
We are able to use the $.getJSON() jQuery function because we applied the “WebGet” attribute to the WCF function “Part1GetRequest()”.
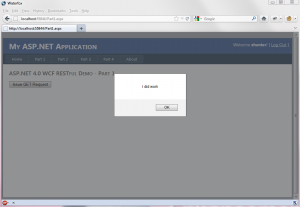
- Launch the application and navigate to “Page 1”. Click on the “Issue GET Request” button and you should see the followign results:
- To get a list of all the functions your service offers, pass the “/help” parameter to your service.
As noted, here is the project I built above following all the steps one-by-one.
>> ASP.NET 4.0 RESTful Web Application Project


