Archive for May, 2010

NPOI – Set Cell Helper

I saw a discussion posting on the NPOI discussion forum on CodePlex today, asking if there was a function like SetCell(X,Y,Value) in NPOI. Unfortunately there isn’t… At least I was never able to find one, so I created my own. Since I only needed to set values I added three basic ones into my helper class to make available to everybody using NPOI in my project. I was really tempted to add these to the HSSFWorksheet, but to keep my code save I figured a helper class for all my extras would be enough. Here is my version of a SetCellValue() helper set of functions.

private static void SetCellValue(HSSFSheet worksheet, int columnPosition, int rowPosition, DateTime value)
{
	// Get row
	using (HSSFRow row = worksheet.GetRow(rowPosition))
	{
		// Get or Create Cell
		using (HSSFCell cell = row.GetCell(columnPosition) ?? row.CreateCell(columnPosition))
		{
			cell.SetCellValue(value);
			cell.CellStyle.DataFormat = 14;
		}
	}
}

private static void SetCellValue(HSSFSheet worksheet, int columnPosition, int rowPosition, double value)
{
	// Get row
	using (HSSFRow row = worksheet.GetRow(rowPosition))
	{
		// Get or Create Cell
		using (HSSFCell cell = row.GetCell(columnPosition) ?? row.CreateCell(columnPosition))
		{
			cell.SetCellValue(value);
		}
	}
}

private static void SetCellValue(HSSFSheet worksheet, int columnPosition, int rowPosition, string value)
{
	// Get row
	using (HSSFRow row = worksheet.GetRow(rowPosition))
	{
		// Get or Create Cell
		using (HSSFCell cell = row.GetCell(columnPosition) ?? row.CreateCell(columnPosition))
		{
			cell.SetCellValue(value);
		}
	}
}

// Set Date
SetCellValue(sheet, 9, 3, DateTime.Now);
// Set Number
SetCellValue(sheet, 9, 4, 100.01);
// Set Text
SetCellValue(sheet, 9, 5, "Zach Roxs!");

As you can see it’s pretty easy to create a SetCellValue() helper. I plan to create another version of these that uses Excel coordinates (e.g. A5, Z10, etc…), so my die hard Excel teammates can use their native Excel mapping syntax!
NPOI – Copy Row Helper

Another day and another little tidbit on using NPOI. I was doing tool mock-up at work today when I ran across a need for a copy row function. After searching high and low, I realized NPOI does not currently offer this capability. After looking around (Google, NPOI and POI threads) I decided to create my own helper function. I’m sure there might be a few things I missed in my routine since the library is a bit new to me, but after testing this against a bunch of different scenarios I’m pretty confident this will work for 99% of my needs and maybe a high percent of yours as well.

Here is the function in all it’s glory, I thought about modify the NPOI source but since I’m not sure where it’s going I figured I’d just add this in my own little NPOI.CustomHelpers class that I can use with my NPOI project.

/// <summary>
/// HSSFRow Copy Command
///
/// Description:  Inserts a existing row into a new row, will automatically push down
///               any existing rows.  Copy is done cell by cell and supports, and the
///               command tries to copy all properties available (style, merged cells, values, etc...)
/// </summary>
/// <param name="workbook">Workbook containing the worksheet that will be changed</param>
/// <param name="worksheet">WorkSheet containing rows to be copied</param>
/// <param name="sourceRowNum">Source Row Number</param>
/// <param name="destinationRowNum">Destination Row Number</param>
private void CopyRow(HSSFWorkbook workbook, HSSFSheet worksheet, int sourceRowNum, int destinationRowNum)
{
	// Get the source / new row
	HSSFRow newRow = worksheet.GetRow(destinationRowNum);
	HSSFRow sourceRow = worksheet.GetRow(sourceRowNum);

	// If the row exist in destination, push down all rows by 1 else create a new row
	if (newRow != null)
	{
		worksheet.ShiftRows(destinationRowNum, worksheet.LastRowNum, 1);
	}
	else
	{
		newRow = worksheet.CreateRow(destinationRowNum);
	}

	// Loop through source columns to add to new row
	for (int i = 0; i < sourceRow.LastCellNum; i++)
	{
		// Grab a copy of the old/new cell
		HSSFCell oldCell = sourceRow.GetCell(i);
		HSSFCell newCell = newRow.CreateCell(i);

		// If the old cell is null jump to next cell
		if (oldCell == null)
		{
			newCell = null;
			continue;
		}

		// Copy style from old cell and apply to new cell
		HSSFCellStyle newCellStyle = workbook.CreateCellStyle();
		newCellStyle.CloneStyleFrom(oldCell.CellStyle); ;
		newCell.CellStyle = newCellStyle;

		// If there is a cell comment, copy
		if (newCell.CellComment != null) newCell.CellComment = oldCell.CellComment;

		// If there is a cell hyperlink, copy
		if (oldCell.Hyperlink != null) newCell.Hyperlink = oldCell.Hyperlink;

		// Set the cell data type
		newCell.SetCellType(oldCell.CellType);

		// Set the cell data value
		switch (oldCell.CellType)
		{
			case HSSFCellType.BLANK:
				newCell.SetCellValue(oldCell.StringCellValue);
				break;
			case HSSFCellType.BOOLEAN:
				newCell.SetCellValue(oldCell.BooleanCellValue);
				break;
			case HSSFCellType.ERROR:
				newCell.SetCellErrorValue(oldCell.ErrorCellValue);
				break;
			case HSSFCellType.FORMULA:
				newCell.SetCellFormula(oldCell.CellFormula);
				break;
			case HSSFCellType.NUMERIC:
				newCell.SetCellValue(oldCell.NumericCellValue);
				break;
			case HSSFCellType.STRING:
				newCell.SetCellValue(oldCell.RichStringCellValue);
				break;
			case HSSFCellType.Unknown:
				newCell.SetCellValue(oldCell.StringCellValue);
				break;
		}
	}

	// If there are are any merged regions in the source row, copy to new row
	for (int i = 0; i < worksheet.NumMergedRegions; i++)
	{
		CellRangeAddress cellRangeAddress = worksheet.GetMergedRegion(i);
		if (cellRangeAddress.FirstRow == sourceRow.RowNum)
		{
			CellRangeAddress newCellRangeAddress = new CellRangeAddress(newRow.RowNum,
																		(newRow.RowNum +
																		 (cellRangeAddress.FirstRow -
																		  cellRangeAddress.LastRow)),
																		cellRangeAddress.FirstColumn,
																		cellRangeAddress.LastColumn);
			worksheet.AddMergedRegion(newCellRangeAddress);
		}
	}

}

The code comments above should give you a good idea of what I’m doing, if something doesn’t make sense just ask. The key things I wanted to make sure got copied were; Cell Style, Cell Value, Cell Type, Merged Cell Settings. In the end I noticed a few other things that I thought I might use in the future, so I included them as well. Here is an example of how to call to CopyRow along with a snapshot of the end result.

// Grab my NPOI workbook memorystream
HSSFWorkbook workbook = new HSSFWorkbook(memoryStream);

// Grab my test worksheet
HSSFSheet sheet = workbook.GetSheet("Sheet1");

// Copy Excel Row 1 to Excel Row 3
CopyRow(workbook, sheet, 0, 2);

// Copy Excel Row 2 to Excel Row 4
CopyRow(workbook, sheet, 1, 3);
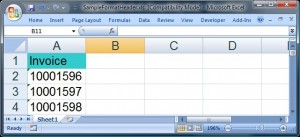
NPOI – Copy Row Helper Function Test Results

Using jQuery to prevent “Delete” mistakes

A few days ago I was reading a web design article that talked about the “Poka-Yoke” principle. It was such a funny phrase that I had to go to Wikipedia to figure out the definition. In a nutshell, the principle refers to the process of “idiot-proofing” human interaction with a process. This term is based on the Japanese words “yokeru” avoid and “poka” mistake, this is rather funny for me since I work for a Japanese company that has clearly never heard of this principle!

This term came to mind today while helping another programmer develop a system to prevent accidental in their UI. After discussing what needed to be done, it was clear that we needed to implement some client side logic to “prevent… guide…” the user into making the correct choices.

The UI was pretty straight forward, there will be a few buttons to do various actions on rows in a table. The users will select one or more rows for the table and then click the button of the action they want to perform. Sounds simple, right… We’ll it is and it’s also really easy to select the wrong row and/or the wrong button. Training is a big help in any process, but one you leave the users alone the system will be the only thing enforcing the rules.

Here is an example of a table where rows will be selected for deletion. I used a “asp:Table” to simulate the markup for a table that will be generated with a “asp:GridView”. In my past 5 years of working with ASP.NET, this was the first time I ever used or seen this control used.

<div class="mediumTable">
	<asp:Button ID="DeleteButton" runat="server" Text="Delete" />
	<asp:Table ID="Table1" runat="server">
		<asp:TableHeaderRow>
			<asp:TableHeaderCell>Chk</asp:TableHeaderCell>
			<asp:TableHeaderCell>Product</asp:TableHeaderCell>
			<asp:TableHeaderCell>Stock</asp:TableHeaderCell>
		</asp:TableHeaderRow>
		<asp:TableRow>
			<asp:TableCell>
				<asp:CheckBox ID="CheckBox1" runat="server" /></asp:TableCell>
			<asp:TableCell>Apples</asp:TableCell>
			<asp:TableCell>0</asp:TableCell>
		</asp:TableRow>
		<asp:TableRow>
			<asp:TableCell>
				<asp:CheckBox ID="CheckBox2" runat="server" /></asp:TableCell>
			<asp:TableCell>Oranges</asp:TableCell>
			<asp:TableCell>100</asp:TableCell>
		</asp:TableRow>
		<asp:TableRow>
			<asp:TableCell>
				<asp:CheckBox ID="CheckBox3" runat="server" /></asp:TableCell>
			<asp:TableCell>Pears</asp:TableCell>
			<asp:TableCell>150</asp:TableCell>
		</asp:TableRow>
		<asp:TableRow>
			<asp:TableCell>
				<asp:CheckBox ID="CheckBox4" runat="server" /></asp:TableCell>
			<asp:TableCell>Watermelon</asp:TableCell>
			<asp:TableCell>2</asp:TableCell>
		</asp:TableRow>
	</asp:Table>
</div>
</form>

Here is the delete “prevention” system we came up. We had a few other ideas like, but after doing a few demos of each solution we decided on the following code that will be discussed below.

$(document).ready(function() {
	$('#<%= DeleteButton.ClientID %>').click(function() {
		// Find all selected items
		var CheckedCheckBoxes = $('#<%= Table1.ClientID %>').find("input[type='checkbox']:checked");
		// If there are no selected items, exit
		if (CheckedCheckBoxes.length == 0) {
			alert("You must make a selection before you can delete an item.");
			return false;
		}
		// If there are selected items, loop
		CheckedCheckBoxes.each(function() {
			var isProcessed = $(this).parent().parent().find('td:last').text();
			// If current item is already processed, set flat to true
			if (jQuery.trim(isProcessed) > 0) {
				deletedProcessed = true;
			}
		});
		// Check flag, if true stop ALL deletes and notify user
		if (deletedProcessed) {
			alert("You can't delete a product with stock!");
			return false;
		}
		else {
			// Do a final confirmation the user wants to delete the selection
			var answer = confirm('Are you sure you want to delete your selection?');
			return answer
		}
	});
});

Since selection box was used for a few different functions (process orders, hold orders and edit orders) we needed a way to add a little extra checking to only the delete button. Our goals with the logic above was the following.

  1. Disables “Delete” if nothing has been selected.
  2. Disables “Delete” if the user selected a item should not be deleted (e.g. Has Inventory).
  3. Prompts the user to confirm the really want to delete the item.

In addition to these ideas, we also had the following ideas…

  1. Alert row # of items that don’t meet the business rule
  2. Highlight the row in “red” that don’t meet the business rule
  3. Physically “Disable” the delete button if they select an item that don’t meet the business rules

Mistakes are human nature and by double and triple checking what they are doing we can save the users and ourselves from many emails/phone calls/visits about how the system “deleted the data all by itself”.

Mistake proofing is such an easy idea to grasp and agree with, that it’s surprising that we don’t see more of it in the systems we using everyday. I’m sure I’ve developed a few bad ones, hopefully the audience using it was small and it didn’t mitigate itself into other things. Working for a Japanese company who has developed some of the worst internal tools I’ve ever seen (0 UI design effort), I’m sure to bring up the new Japanese “Poka-Yoke” principle that next time I talk to one of the developers in Japan.

How to read in XLSX data for editing with NPOI

NPOI is a great solution for working with XLS documents, but what happens when you need to read in XLSX documents as part of your solution? The easiest solution I could think of was to use OLEDB to extract out all the data (the data, the whole data and nothing but the data) from a worksheet into a new NPOI document.

If you need more support than just reading in data from Excel 2007+ (XLSX), you should look at using the ExcelPackage project that is hosted at CodePlex.

The benefit to my approach, is that your able to use your existing NPOI solutions when data is provided in XLSX format. This is far from full Excel 2007+ support, but if your applicaitons only requirement is “reading in data” then your problem is solved. NPOI v1.6 is supposed to fully support the XLSX format, until then this function will provide basic XLSX support.

Functions used to convert XLSX document to a NPOI document
/// <summary>
/// Render a Excel 2007 (xlsx) Worksheet to NPOI Excel 2003 Worksheet, all excel formatting
/// from XLSX will be lost when converted.  NPOI roadmap shows v1.6 will support Excel 2007 (xlsx).
/// NPOI Roadmap  : http://npoi.codeplex.com/wikipage?title=NPOI%20Road%20Map&referringTitle=Documentation
/// NPOI Homepage : http://npoi.codeplex.com/
/// </summary>
/// <param name="excelFileStream">XLSX FileStream</param>
/// <param name="sheetName">Excel worksheet to convert</param>
/// <returns>MemoryStream containing NPOI Excel workbook</returns>
public static Stream ConvertXLSXWorksheetToXLSWorksheet(Stream excelFileStream, string sheetName)
{
	// Temp file name
	string tempFile = HttpContext.Current.Server.MapPath("~/uploads/" + HttpContext.Current.Session.LCID + ".tmp");

	// Temp data container (using DataTable to leverage existing RenderDataTableToExcel function)
	DataTable dt = new DataTable();

	try
	{
		// Create temp XLSX file
		FileStream fileStream = new FileStream(tempFile, FileMode.Create, FileAccess.Write);

		const int length = 256;
		Byte[] buffer = new Byte[length];
		int bytesRead = excelFileStream.Read(buffer, 0, length);

		while (bytesRead > 0)
		{
			fileStream.Write(buffer, 0, bytesRead);
			bytesRead = excelFileStream.Read(buffer, 0, length);
		}

		excelFileStream.Close();
		fileStream.Close();

		// Read temp XLSX file using OLEDB
		// Tested on Vista & Windows 2008 R2
		using (OleDbConnection con = new OleDbConnection(@"Provider=Microsoft.ACE.OLEDB.12.0; Extended Properties=Excel 12.0;Data Source=" + tempFile + @";Extended Properties=Excel 12.0;"))
		{
			con.Open();
			string sql = String.Format("SELECT * FROM [{0}$]", sheetName);
			OleDbDataAdapter da = new OleDbDataAdapter(sql, con);

			da.Fill(dt);
		}
	}
	finally
	{
		// Make sure temp file is deleted
		File.Delete(tempFile);
	}

	// Return a new POI Excel 2003 Workbook
	return RenderDataTableToExcel(dt);
}

/// <summary>
/// Render DataTable to NPOI Excel 2003 MemoryStream
/// NOTE:  Limitation of 65,536 rows suppored by XLS
/// </summary>
/// <param name="sourceTable">Source DataTable</param>
/// <returns>MemoryStream containing NPOI Excel workbook</returns>
public static Stream RenderDataTableToExcel(DataTable sourceTable)
{
	HSSFWorkbook workbook = new HSSFWorkbook();
	MemoryStream memoryStream = new MemoryStream();
	// By default NPOI creates "Sheet0" which is inconsistent with Excel using "Sheet1"
	HSSFSheet sheet = workbook.CreateSheet("Sheet1");
	HSSFRow headerRow = sheet.CreateRow(0);

	// Header Row
	foreach (DataColumn column in sourceTable.Columns)
		headerRow.CreateCell(column.Ordinal).SetCellValue(column.ColumnName);

	// Detail Rows
	int rowIndex = 1;

	foreach (DataRow row in sourceTable.Rows)
	{
		HSSFRow dataRow = sheet.CreateRow(rowIndex);

		foreach (DataColumn column in sourceTable.Columns)
		{
			dataRow.CreateCell(column.Ordinal).SetCellValue(row[column].ToString());
		}

		rowIndex++;
	}

	workbook.Write(memoryStream);
	memoryStream.Flush();
	memoryStream.Position = 0;

	return memoryStream;
}

NOTE: You could convert an entire workbook (multiple work sheets) into a new NPOI workbook if you looped over each work sheet in the XLSX document. Since all my tools are based on using a single work sheet, I’ll leave the workbook conversion up to you.

Example using XLSX function
if (FileUpload.PostedFile.ContentLength > 0)
{
	Stream uploadFileStream = FileUpload.PostedFile.InputStream;

	// If the file uploaded is "XLSX", convert it's Sheet1 to a NPOI document
	if (FileUpload.PostedFile.FileName.EndsWith("xlsx"))
	{
		uploadFileStream = ExcelHelper.ConvertXLSXWorksheetToXLSWorksheet(uploadFileStream, "Sheet1");
	}
}

** All your NPOI logic that adds columns, changes cell/row formatting, etc… will now work with the data extracted from the XLSX document.

Use NPOI to populate an Excel template

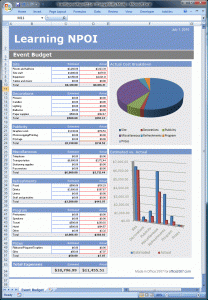
So I’ve been using NPOI all week and decide to do a quick “demo” for my team today. My demo was to show how to use NPOI to populate (update) an Excel template that includes various charts.  Even though NPOI does not support creating charts from scratch, it does support updating files that already include (hence template) charts. I started by going to the Microsoft website where they have a bunch of free “pretty” templates on, randomly choosing one with a bunch of formulas and charts.  It took me about an hour to build the complete demo using very simple and easy to read code. Most of the updates or just putting values in cells, but the actual process of opening/reading/inserting/saving a new or existing file in NPOI is very easy for a novice programmers.

Development Summary ( Step-by-Step )

  1. Get a template, I grabbed mine from here ( office.microsoft.com ).
    ** I only used the first sheet and deleted all the sample data
  2. Create a new ASP.NET 3.5 Web Application projecct
  3. Download NPOI binaries and include in your project
  4. Build a UI that will be used to populate your template.
    ** This could also be populated by a data sources (db, XML, etc..)
    ** NOTE:  I used Excel to create the form using Excel formulas
  5. Add some c# code “magic” to load data into the template using NPOI

Sounds simple because it is… Here is the code to add the form contents into the Excel template.

// Open Template
FileStream fs = new FileStream(Server.MapPath(@"\template\Template_EventBudget.xls"), FileMode.Open, FileAccess.Read);

// Load the template into a NPOI workbook
HSSFWorkbook templateWorkbook = new HSSFWorkbook(fs, true);

// Load the sheet you are going to use as a template into NPOI
HSSFSheet sheet = templateWorkbook.GetSheet("Event Budget");

// Insert data into template
sheet.GetRow(1).GetCell(1).SetCellValue(EventName.Value);  // Inserting a string value into Excel
sheet.GetRow(1).GetCell(5).SetCellValue(DateTime.Parse(EventDate.Value));  // Inserting a date value into Excel

sheet.GetRow(5).GetCell(2).SetCellValue(Double.Parse(Roomandhallfees.Value));  // Inserting a number value into Excel
sheet.GetRow(6).GetCell(2).SetCellValue(Double.Parse(Sitestaff.Value));
sheet.GetRow(7).GetCell(2).SetCellValue(Double.Parse(Equipment.Value));
sheet.GetRow(8).GetCell(2).SetCellValue(Double.Parse(Tablesandchairs.Value));
sheet.GetRow(12).GetCell(2).SetCellValue(Double.Parse(Flowers.Value));
sheet.GetRow(13).GetCell(2).SetCellValue(Double.Parse(Candles.Value));
sheet.GetRow(14).GetCell(2).SetCellValue(Double.Parse(Lighting.Value));
sheet.GetRow(15).GetCell(2).SetCellValue(Double.Parse(Balloons.Value));
sheet.GetRow(16).GetCell(2).SetCellValue(Double.Parse(Papersupplies.Value));
sheet.GetRow(20).GetCell(2).SetCellValue(Double.Parse(Graphicswork.Value));
sheet.GetRow(21).GetCell(2).SetCellValue(Double.Parse(Photocopying_Printing.Value));
sheet.GetRow(22).GetCell(2).SetCellValue(Double.Parse(Postage.Value));
sheet.GetRow(26).GetCell(2).SetCellValue(Double.Parse(Telephone.Value));
sheet.GetRow(27).GetCell(2).SetCellValue(Double.Parse(Transportation.Value));
sheet.GetRow(28).GetCell(2).SetCellValue(Double.Parse(Stationerysupplies.Value));
sheet.GetRow(29).GetCell(2).SetCellValue(Double.Parse(Faxservices.Value));
sheet.GetRow(33).GetCell(2).SetCellValue(Double.Parse(Food.Value));
sheet.GetRow(34).GetCell(2).SetCellValue(Double.Parse(Drinks.Value));
sheet.GetRow(35).GetCell(2).SetCellValue(Double.Parse(Linens.Value));
sheet.GetRow(36).GetCell(2).SetCellValue(Double.Parse(Staffandgratuities.Value));
sheet.GetRow(40).GetCell(2).SetCellValue(Double.Parse(Performers.Value));
sheet.GetRow(41).GetCell(2).SetCellValue(Double.Parse(Speakers.Value));
sheet.GetRow(42).GetCell(2).SetCellValue(Double.Parse(Travel.Value));
sheet.GetRow(43).GetCell(2).SetCellValue(Double.Parse(Hotel.Value));
sheet.GetRow(44).GetCell(2).SetCellValue(Double.Parse(Other.Value));
sheet.GetRow(48).GetCell(2).SetCellValue(Double.Parse(Ribbons_Plaques_Trophies.Value));
sheet.GetRow(49).GetCell(2).SetCellValue(Double.Parse(Gifts.Value));

// Force formulas to update with new data we added
sheet.ForceFormulaRecalculation = true;

// Save the NPOI workbook into a memory stream to be sent to the browser, could have saved to disk.
MemoryStream ms = new MemoryStream();
templateWorkbook.Write(ms);

// Send the memory stream to the browser
ExportDataTableToExcel(ms, "EventExpenseReport.xls");

Here are the screen shots of the form and completed template…

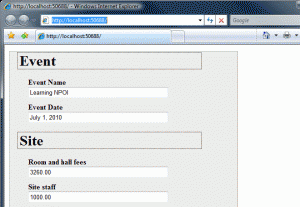
Here is demo UI.
NPOI - ASP.NET Form used to populate a Excel Template
Here is a populated template.
NPOI - ASP.NET Form merged with Excel template

Here is a copy of the XLS file created in the program:  NPOI – ASP.NET Form merged with Excel template

Here is a copy of the source code for the demo:  NPOI – Visual Studio 2008 (ASP.NET 3.5) Template Merge Demo

** There was a caveat during the development process.  During the demo I found a bug with NPOI opening my XLS file and I had to download the source code and make two changes to get NPOI to open my XLS template (bug states this issue is caused when you save a XLSX file as XLS in Excel 2007). Read this post to see the fix or use the DLLs for NPOI included in my demo project.

** NPOI is a active Open Source project, the bugs found have probably already been fixed and if you download the latest code from CodePlex, you’ll probably have no problems running the demo.

NPOI and the Excel 2003 row limit

I ran into a problem today, testing my new NPOI DataTable web export function… While running some large queries that resulted in 65K+ rows of data, my function blew up. As you know, Excel 2003 and the BIFF format only support 65,536 rows! To make sure this never happens again, I’ve added a little block of code around my details loop to create an additional sheet every time you reach row 65,536.

code excerpt based on using a DataTable as your data source
int rowIndex = 1;               // Starting Row (0 = Header)
int sheetIndex = 1;             // Starting sheet is always set to "Sheet1"
const int maxRows = 65536;      // Max rows p/sheet in Excel 2003

// Start loop of details to write to sheet
foreach (DataRow row in DataTableToExport.Rows)
{
	// Check if max rows hit, if so start new sheet and copy headers from current sheet.
	if(rowIndex % maxRows == 0)
	{
		// Auto size columns on current sheet
		for (int h = 0; h < headerRow.LastCellNum; h++)
		{
			sheet.AutoSizeColumn(h);
		}

		// Increment sheet counter
		sheetIndex++;

		// Create new sheet
		sheet = workbook.CreateSheet("Sheet" + sheetIndex);

		// Create header on new sheet
		HSSFRow additionalHeaderRow = sheet.CreateRow(0);

		// Copy headers from first sheet
		for (int h = 0; h < headerRow.LastCellNum; h++)
		{
			HSSFCell additionalHeaderColumn = additionalHeaderRow.CreateCell(h);
			additionalHeaderColumn.CellStyle = headerRow.GetCell(h).CellStyle;
			additionalHeaderColumn.SetCellValue(headerRow.GetCell(h).RichStringCellValue);
		}

		rowIndex = 1;
	}

	// Create new detail row in sheet
	HSSFRow dataRow = sheet.CreateRow(rowIndex);
	// Loop the columns from the DataRow and add using dataRow.CreateCell(#)....
}

In a nutshell, I create some counters before going into the detail row loop to track the Row and Sheet number. When I hit the max Row number number on a sheet, I create a new Sheet. To keep everything pretty, I copy the header row from the first sheet to the first row of the new sheet. The only output limitation now is the max sheets of 255.

Build beautiful XLS documents in .NET with NPOI

I’ve seen Excel used for a ton of different solutions; Flow Charts, Business Forms, EDI, Photo Album, etc… Regardless of how Excel is being used, it’s one of the most common business document formats I know.  We commonly refer to Excel as duct tape, in the office.  I’ve traditionally limited my web & Excel integration to the capabilities of the System.Data.OleDb namespace. This has been a great solution, and when you can’t buy 3rd party controls or run code in full trust, it’s a proven solution. This has solved 99% of my problems, but there’s always been a need to do a bit more than use Excel as a basic data source.  Fortunate for me, I found a trail of posts in StackOverflow that lead me to NPOI.  It is a .NET implementation of the Apache POI Project.  NPOI is a bit behind POI, but this amazing library gives you the ability to develop rich Excel with a easy to use API.

I’ve run into a few bugs since starting, but I found lots of posts on CodePlex where the project is hosted.  I’ve found that running 1.2.2 (alpha) solves a bunch of bugs I immediately found when running 1.2.1.  I downloaded the latest build from CodePlex, but it was still on a 1.2.1 branch and was missing some of the 1.2.2 fixes.

Now that we know what NPOI is going to provide us, lets go grab the files we’ll need to get started.

  1. NPOI.Util Basic assistant class library
  2. NPOI.POIFS OLE2 format read/write library
  3. NPOI.DDF Drawing format read/write library
  4. NPOI.SS Formula evaluation library
  5. NPOI.HPSF Summary Information and Document Summary Information read/write library
  6. NPOI.HSSF Excel BIFF format read/write library

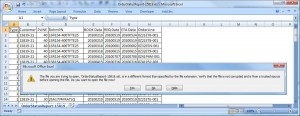
To keep the demo easy to follow and provide some good ways to refactor NPOI into your existing project, I’ve taken a old function that would output a DataTable to a HTML formatted document with an Excel (xls) extension.  This solution has worked for years, but every time you open one of these XLS files you get the following message (“The file you are trying to open “”, is in a different format than specified by the file extension. Verify that the file is not corrupted and is from a trusted source before opening the file. Do you want to open the file now?“).  It’s a bit annoying and scary to the user, but this approach was used to solve the problem of Excel truncating leading zero’s in numeric data (e.g. 00002345).

Before NPOI Function (DataTable to HTML document saved with a XLS extension)
/// <summary>
/// Exports a DataTable as a HTML formatted table and forces the results to be downloaded in a .HTM file.
/// </summary>
/// <param name="dataTable">DataTable</param>
/// <param name="fileName">Output File Name</param>
static public void DataTableToHtmlXLS(DataTable dataTable, string fileName)
{
	//Add _response header
	HttpResponse response = HttpContext.Current.Response;
	response.Clear();
	response.ClearHeaders();
	response.AddHeader("content-disposition", string.Format("attachment;filename={0}.xls", fileName));
	response.ContentEncoding = Encoding.Default;
	response.Charset = String.Empty;
	response.ContentType = "text/HTML";

	DataGrid dataGrid = new DataGrid();
	dataGrid.EnableViewState = false;
	dataGrid.DataSource = dataTable;
	dataGrid.DataBind();

	StringWriter sw = new StringWriter();
	HtmlTextWriter hw = new HtmlTextWriter(sw);

	dataGrid.RenderControl(hw);
	response.Write(sw.ToString());

	response.End();
}
Error opening HTML file saved as XLS

** If you were to look at the the XLS file in notepad, you’d see the contents are HTML.

NPOI Function (DataTable to Excel)
/// <summary>
/// Render DataTable to Excel File
/// </summary>
/// <param name="sourceTable">Source DataTable</param>
/// <param name="fileName">Destination File name</param>
public static void ExportDataTableToExcel(DataTable sourceTable, string fileName)
{
	HSSFWorkbook workbook = new HSSFWorkbook();
	MemoryStream memoryStream = new MemoryStream();
	HSSFSheet sheet = workbook.CreateSheet("Sheet1");
	HSSFRow headerRow = sheet.CreateRow(0);

	// handling header.
	foreach (DataColumn column in sourceTable.Columns)
		headerRow.CreateCell(column.Ordinal).SetCellValue(column.ColumnName);

	// handling value.
	int rowIndex = 1;

	foreach (DataRow row in sourceTable.Rows)
	{
		HSSFRow dataRow = sheet.CreateRow(rowIndex);

		foreach (DataColumn column in sourceTable.Columns)
		{
			dataRow.CreateCell(column.Ordinal).SetCellValue(row[column].ToString());
		}

		rowIndex++;
	}

	workbook.Write(memoryStream);
	memoryStream.Flush();

	HttpResponse response = HttpContext.Current.Response;
	response.ContentType = "application/vnd.ms-excel";
	response.AddHeader("Content-Disposition", string.Format("attachment;filename={0}", fileName));
	response.Clear();

	response.BinaryWrite(memoryStream.GetBuffer());
	response.End();
}

** Pretty simple right?  In my production code this is actually split into multiple functions so I can reuse the DataTable to Excel code.  The output of this function is a Excel 2003 (XLS) BIFF.

Now that we are using NPOI to create “real” XLS documents, we can do something cool like add formatting to our header row.

// handling header.
foreach (DataColumn column in sourceTable.Columns)
{
	// Create New Cell
	HSSFCell headerCell = headerRow.CreateCell(column.Ordinal);

	// Set Cell Value
	headerCell.SetCellValue(column.ColumnName);

	// Create Style
	HSSFCellStyle headerCellStyle = workbook.CreateCellStyle();
	headerCellStyle.FillForegroundColor = HSSFColor.AQUA.index;
	headerCellStyle.FillPattern = CellFillPattern.SOLID_FOREGROUND;

	// Add Style to Cell
	headerCell.CellStyle = headerCellStyle;
}
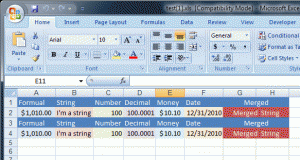
Adding Color Headers to POI Excel File

There is a million more formatting options possible and by the time you read this you should find a few more example on my site.